Tuesday, December 14, 2010

Significant outfit

I didn't originally post because I wasn't invited to blog at time of assignment and didn't think it would ever get graded...

Anyway this is the only outfit that carries any significance in the last 6 months or so. That is the other reason I didn't post. Long story. Anyway I have a finished basement and that is where I pretty much am all the time, my office is there, entertainment, whatever. Anyway my daughter often plays and watches movies down here while I am working or studying.

She had just fallen down the stairs (upstairs) a couple days ago, and she had to go to the bathroom bad. She was holding herself, whining and trying to make it up the stairs. I grabbed her underneath her arms and carried her up the steps, my foot slipped off one of the steps near the landing. Her mouth caught the corner of the step, indentations from her former teeth are permanent in the wood floor. So she lost four front top teeth. It was really hard for me to deal with emotionally, probably the worst thing in my adult life.

(she is now 3) The good news, she will get temporary teeth put in right after the holidays. They will be both wired and cemented and will be removed when she is 7 or 8 and starts losing her baby teeth. We have anxiously been awaiting her molars to fully come in before the procedure could be done.

I learned a lot of humility from that event. As a parent you have this feeling that you can protect your child from anyone or anything. To be the cause of something like that is devastating and at least in my case was very traumatic to me. I guess this probably should have been my topic for the secret also, but that would have been easy to figure out!

The other thing I learned is that, it could have been worse. If her face had hit just an inch or so higher on her face it would have been a direct shot to her nose. If it were lower it would have been her throat. In light of the event I always make time and slow down for my daughter now, before I could say that it was 50/50 it depended on if I was really busy or not.

the outfit i was wearing when i realized i was not any one special

my friends car

car shot[s]


i feel like this person is on the run or stays over at other places a lot cause they have a big bag of clothes and then a pillow and comforter in their trunk...very interesting

significant outfit


this outfit is significant to me because i got something while wearing this that i had been wanting for 3 years, so since then this has been my favorite ensemble :]

Sarah - Self Portrait Grid

Daily photos

Outfit

I don't know what happened last time, I guess it got lost in the black hole of the internet. Well here it is, this outfit was from back when i could fit my body in hot pants...

portrait video

Self portaits video

Thursday, December 9, 2010

Jessica-Self Portrait

How to render this with good resolution.
Steps:
File-Export-Render Video-MPEG4
Click Settings
~file format: MP4
~video format: H.264
~image size: 640x480 VGA
~frame rate: 10
click ok
click render
*make sure you saved it in the right location and with the name of the file you want!!

Wednesday, December 8, 2010

All Assignments and Projects that will be graded

***PLEASE KEEP IN MIND THAT ATTENDANCE AND CLASS PARTICIPATION ALSO GREATLY AFFECT YOUR GRADE***

Night Photography Project
Series of 3 images

Self Portrait Project

Animation on blog

Grid Image


Morph Project
Printed composite image

Secrets Project
Series of 4 prints

Ambiguous Doppelgangers Project (multiples instance project)
Series of 4 images

Generative Art Assignment

Cell Phone Assignment

Through the Car Window Assignment

Zoom Blur, Color Channel Shifting, & Panning Assignment

Under the Bed Assignment

Significant Outfit Assignment


How to create the Self Portrait Video for extra credit


First, keep all your layers when assembling the grid. Using the Move tool with the Auto Select feature active (set it in the options bar below the main menu), move all the layers to the upper left corner. This will put the all into one stack. Then, crop the image so that in only contains the image area. Then crop this image to 352x288 pixels. If your images are square or vertical, then you will have to extend the width of the image to create black bars to keep the video horizontal without cropping your image. If you are more savvy or want a higher resolution video, then you can the video as MP4 Basic using 640x480 instead. See images below.

You will start by laying things out as though you were going to create an animated GIF. How to create an animated GIF using Photoshop. Rather then save as a GIF though, you are going to export it as MPEG4 video. This way you can upload it to YouTube or other video hosting site. I want you to post them to the blog. Export video options within PS.


Thursday, November 25, 2010

Great color management article by Andrew Rodney

Luminous Landscape, a really great photography website, has recently posted an article by Andrew Rodney titled Why Are My Prints Too Dark. It is very current and address some maters that have arrisen since the 2005 publication of his excellent book on the subject; Color Management for Photographers. I encourage you to read it and the numerous articles that he links to.

Monday, November 22, 2010

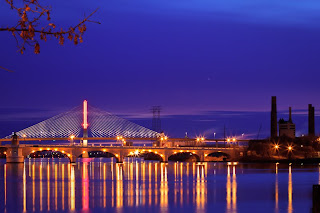
Night Photography

Your final project is going to be a short series (3 shots) of night photography. Here are some things to keep in mind when shooting at night:


-If you are including the moon, sunset, or sunrise, consider where it will be at the time of your shoot. OF course, the sun rises in the east and sets in the west (changes a little throughout the year, but not much). So, you will get a vastly different photo when shooting sunrises to the east or sunsets to the west.


-It is going to be very dark. Bring a flashlight. This will help you see your camera as well as see where you are going.


-You must use a tripod as exposure times will be long


-Use a remote release to trigger your camera. Or use the self timer if the timing of the shutter release isn't critical. You may want to invest in a cable release which has a timer function. This will allow you to use a shutter speed longer than what the camera otherwise offers. For example, the longest shutter speed my Nikon D300 offers is 30 seconds. If I need a shutter speed longer than that, I have to use the Bulb setting. In that mode, you have to hold the shutter release button down to keep the shutter open. This is not conducive to sharp photos. Higher end cable releases have timer functions built in that will allow you to set longer times and hold them with a single press of the cable release button.


-Use the mirror lock up or anti-shock feature of your camera. This will help insure that the photo won't be soft due to vibrations from the mirror (Only applies to those using DSLRs as compact digital cameras don't make use of a mirror).


-Turn on long exposure noise reduction if your camera has it. Most DSLRs and some compact cameras do. May have dig through the custom menus to activate it. The problem with this is your longer exposures will take a very long time to complete. Let’s say you take a 30 second exposure. First the camera takes the normal shot, and then it takes another 30 second shot in which the shutter doesn’t open. It takes the resulting noise pattern and subtracts it from the original exposure. It is very effective, but it really slows shooting down. Not a big deal when it is 80 degrees out, but it really stinks when it is 25 degrees out.


-Bring your camera’s instruction manual. You should always carry it with you anyways. If you are using a seldom used feature like long exposure noise reduction, then it is likely that you will have to look up how to activate it.


-Use your cameras lowest ISO. This assumes that you can use a very slow shutter speed as needed. For most of you this will require that you use the bulb mode in which the shutter will remain open as long as you keep the shutter release button pressed. Many of the remote releases have a provision to lock the button down until you release it. If your camera doesn’t have a slow enough shutter speed, then you may have to increase the ISO in order to obtain a correct exposure even when the aperture is lens all the way open.


-You may have to manually focus. All autofocus cameras require a certain light level to autofocus. If you are setting up in the dark, you will have precious little (if any light) so you may have to manually focus. If you have a DSLR, you can set the lens on infinity. You should note that the lens will likely allow you to focus past infinity. Past infinity?!? This is to take into account the expansion of the lens due to different weather, humidity, and pressure. So, you make have to take a few photos to insure that it is really set at infinity. Almost all compact digital cameras have a manual focus provision that entails selecting a distance from a distance scale. I simply set mine for infinity when using a compact camera. I was happy with the results. Another neat trick is to utilize an external flash. They often have a much more powerful autofocus assist light built in that will allow your camera to focus in pitch black night. So, you would use it focus, then turn the flash off.


-Consider all the ambient light sources unless. Even a very weak light adds up during a long exposure.


-Set your white balance to daylight. This will preserve the unique colors at that time of day. There is no point at getting up at 2am if you just want to take a photo that looks like it was taken at noon.


-Start taking photos before you even see the sun. There is usually a lot of color in the sky that you don't even notice until you take a long exposure photo and see it. Try it.


-Remember to expose for the highlights. Ensure that you are taking in enough light so that the histogram is very close to the right most wall without touching it. On a recent outing I noticed that some of my students were not doing that because it looked better on the LCD when it was underexposed. That is true. However, it will not look nearly as good as the image that was properly exposed once you begin editing on it the computer.


-Shoot RAW file format (assuming your camera supports it). If it is worth shooting, then it is worth shooting as a RAW file.


-Consider creating a HDR image from multiple, varying exposure (I will soon post more on HDR).


-Look for reflections in water (assuming there is water) that will give you twice the color.


-Bring a cell phone or a buddy; preferably both. If you are trouncing around in the dark it is a good idea to have a way of getting some help should you run into any trouble. Please take this seriously.

morpheus morpher - first 18 people to talk to me at the wedding

generative art


Morph

Sunday, November 21, 2010

Alyssa's 5th floor Ottawa East

Fantastic digital photography resource

ASMP's DPBestflow. American Society of Media Photographers' awesome resource on digital photography best workflows/practices. Be sure to check it out and bookmark it.

Morphy Morph McMorphster

Notes on tomorrow

1. Check the colorspace of the morphed images.
2. Critique morphed images and revel in the majesty of their splendor
3. Print morphed images. Resulting prints will will bring viewer to tears
4. Discuss options for the final project.
5. Discuss how to best present your daily portrait series.

Friday, November 19, 2010

Speaking of edits and body image...

Here is a really fascinating article about how Playboy edits its photos. FYI- given that this is about Playboy, there are images of nude woman. Also of note, Christies auction house is auctioning these off. You can find links in the article to the individual images and their anticipated selling price.

Tuesday, November 16, 2010

Tuesday, November 9, 2010

Quick Notes on the future of photography

-Less use of flash. Ambient light photos will become the norm as the sensor and signal processing continues to improve. Higher ISO images still look good. Ambient light photos preserve more of the ambience of a scene. Photos will improve.

-Mirrorless cameras will become the norm. Why will we need them?

-The use of shutters will decrease. The ability of the sensor to regulate exposure time will be perfected for all cameras. Many cameras already don't require the use of physical shutters.

-Lenses will become increasingly compact as more reliance is made on digital software correction for optical distortion including barrel distortion, pincushion distortion, and chromatic aberrations.

-The world will blow up in a fiery blaze.