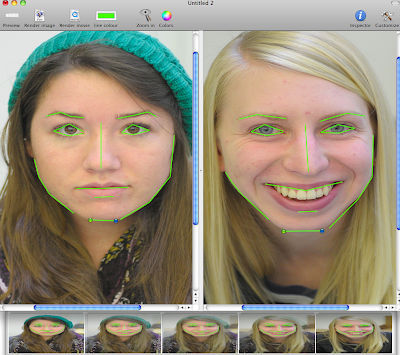

I revisited Morph X, a (nearly) free morphing application for the Mac, since we have a Mac lab and many of you have Macs. It is free for Mac OSX 10.5 and 10.6, but you have to pay $1.99 for it via the App Store if you are 'lucky' enough to be running OSX 10.7 (Lion). At first I didn't really get how the program works, but now that I have played with it more, it is quite capable. Certainly capable enough to complete your morphing assignment.
Like all these programs, there is a bit of a learning curve. So, for your reading pleasure, here is a short tutorial on using it to complete this project.
Once you launch the application, you will see two fields for images. Drag the two photos you want to morph here. Note: You can only morph two images together at a time, so you will have to make multiple first generation composites, then morph the resulting second generation images to create a third generation composite, and so forth until you are left with only one image. This is arguably more work than doing it at once using Sqirlz Morph, but I don't know if it really is.
The part that varies between this application and the others that we used is that you make little lines here whereas in the other apps you only place points. It is pretty much the same thing though.
READ THE MORPH X HELP!! I have copied it below:
MorphX
Use MorphX to transform one image into another. The transformation is saved as a QuickTime Movie or as a Tiff image.
Basic Usage
Drag two images into the First Image and Last Image areas. Alternatively leave one of the images blank, to just use the colour values of one image instead of mixing two.
Draw control lines to identify similar regions in the images. Press the mouse, drag and then release the mouse button to draw a single line to identify an object and then move the line in the other image to the corresponding object. Eg when morphing between two faces you draw lines at the mouth, eyes and around the face in one editor, and then move the lines in the other so that the line on the nose in the first image is on the nose of the image of the second editor.
Connected lines are created by clicking in the image instead of dragging. To finish creating line segments you click twice on the same point. The connected lines work similar to the single lines in how they define the morphing.
Move lines by clicking on them and dragging. Change the angle or length by clicking on the end point of a line and dragging.
Alternatively the arrow keys on the keyboard can be used to move the lines. Pressing Shift or Option while pressing an arrow key moves just one end of the line. Lines are deleted by first selecting them and then pressing backspace.
At the bottom of the window a preview of the morph can be viewed.
There is an inspector for the lines that can be brought forward by selecting Inspector from the Edit menu. The lines movement in the morph can be controlled as well as when and at what speed nearby points should change colour.
When clicking or dragging you can use some mofidified keys to control selection and movement etc.
| Key | Function |
| Control or right mouse button | All lines within a dragged rectangle will be selected. If you click instead of drag the closest line will be selected. |
| Control or right mouse button + Command | Extend or reduce the current selection |
| Alternate | Create a new line even if we're very close to an existing line |
| Shift | Move the closest line. |
Instead of pressing Control you can use the right mouse button.
Calculate the Morph movie by clicking Render Movie in the toolbar at the top of the window. Calculate a Morph still image by clicking Render image. Save the result by clicking the "Save" button in the rendered window.
In a nutshell, you click and it makes a point. You click again it draws a line between the two points. If you double click the last point, it closes the line/path. Then you go to the second window and move the points, and thus the line as well, into position. Notice I just put points/lines on the face and not the hair. That is just an aesthetic choice.
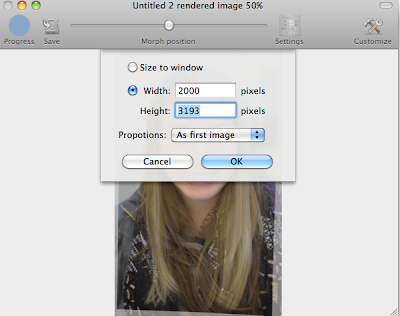
To create a still, you simply click the Render Image button at the top. It is important that you then hit the Settings button. There, you can put in your desired output resolution. I suggest you match it to the first image (the one on the left), i.e. you should up in the pixel dimension of the first image these fields. I put 2000 x 3193 pixels for this example which would indicate that I took the images with a 6MP camera. Hit OK, then hit Save. It will save it as a JPEG. That's fine. Repeat as necessary.
The photo at the top of this posting was made with the settings and points as indicated. It is actually a pretty fast process.
****AS EVIDENCED DURING THE CLASS DEMO, IT WON'T CREATE FILES WITH A PIXEL DIMENSION GREATER THAN 3000 PIXELS IN ANY DIRECTION.**** If you put in the numbers, and the preview looks really crazy, drop the resolution down a few hundred at a time until the preview looks normal then run it.

***BAD LINK NOW*****Trying to locate still...
Here is a PDF that a video professor wrote up on using MorphX to create a simple morph animation. Most of what it says applies. You may find it helpful to read it.
Here is a PDF that a video professor wrote up on using MorphX to create a simple morph animation. Most of what it says applies. You may find it helpful to read it.
***********
No comments:
Post a Comment