FYI-this whole process takes a lot of time; i.e. hours.
Sqirlz Morph- Windows only morphing freeware- Let me begin by saying that this is really a fantastic program. I am really enjoying using it and learning more about it.

First, it doesn't support TIFFs: neither opening them nor saving as. Your options for both at BMP and JPEG. It appears to support non-compressed BMPs so, in terms of absolute greatest quality you should begin with BMPs generated from your RAW files. That being said, it is easier to just open all your RAW files in Camera Raw, select them all, then use the Save dialog in the bottom left to save a high quality JPEG of them all.
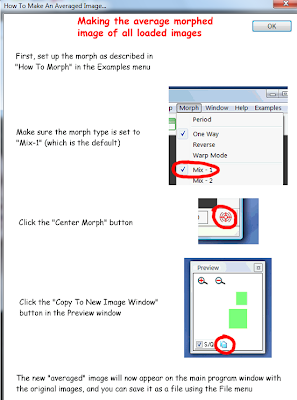
Sqirlz (I love saying that!) allows you to open and work with multiple images at once. This is awesome. You are going to have to decide how many images you want to work with at once. You might find it more difficult to work with more images at once. I worked on two at once, then opened another one. It will try to autoplace all the points you already made on the newly opened image. You can and should save the project frequently by going to File > Project > Save As. I think the best bet is to take the approach of beginning with two images and placing all the points. Save. Then open another image and move the points as necessary. Save. Repeat until complete. Then, follow the directions below from the program's help to combine them into one image (You can get to these instructions by going to Examples > How to Make an Averaged Morph Image):

To save the resulting composite image, go to File > Save As. Select BMP as the file format. Check the resolution of the final morphed image to make sure it is still the appropriate resolution.

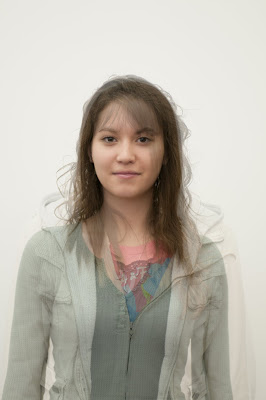
For this sample image, I morphed Sarah, Qina, and Kayla together. I used 31 key points for each image. You may require more. I only keyed points in the face as that is the look that I like. I love the weird semi-opaque overlap of the other areas.
Morpheus Photo Morpher Mac is a $29 morphing app for Macs. You can download a fully functioning 30 day trial. You can definetely use it with high resolution images to create a high resolution morphed composite image, but the set up is a little tricky.
Begin by dragging the photos you want to work with into the image boxes. To get the resolution issue squared away, from the main menu go to Timeline > Options. In the Size fields, input the size in pixels that the resulting morphed image should be. I suggest that you use the pixel dimensions from the larger of the two source images.
To Save the project in Morpheus, you go to File > Save Layout As. Save frequently, saving multiple versions as you go. I suggest you open up one image, put a bunch of key points on it. Then move the key points in the second image to where they should be. It is nice that they are color coded. I can't find a way to morph multiple images into one using this program. You will have to morph in multiple generations. Morph two first generation images together to create a second generation. Repeat the process until all pairs of morphed images are second generation images. Then morph the second generations together, etc. into you have a single image. This is more time consuming than using Sqirlz, but it seems to be the best available for the Mac. Plus, you will get a different result this way. It may be more interesting?
When you want to create the still image, you have to go to File > Render Timeline. Select TIFF as the file format. The program will create 15 TIFFs; one for each 'frame' of the animation. Pull the one you want from the middle. Check the resolution of the final morphed image to make sure it is still the appropriate resolution.
No comments:
Post a Comment