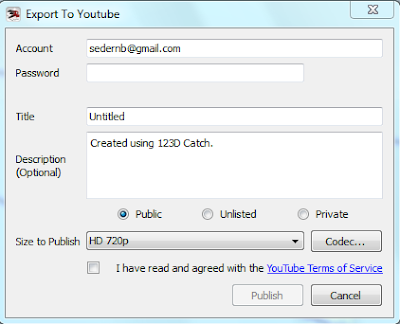
If you are trying to complete the 'fly by' video of your 3D model, for extra credit, and are having troubles with it, the issue is the default video codec. A codec is basically the algorithm used for the compression of the video. YouTube doesn't seem to like the default Microsoft RLE codec. I had to change the codec that I used to by Cinepak Codec by Radius. Then it worked like a charm.
I have attached two screen grabs for your review. If/when you get it to work, email me a link to the video. See you all bright and early tomorrow. I will bring donuts.
This blog is designed to facilitate the instruction of ART 3000 Digital Photography; a Digital Photography course offered at the University of Toledo in Toledo, OH, USA.
Tuesday, May 1, 2012
Monday, April 30, 2012
3D fly by of Jason
This is a video 'fly by' of Jason's head and shoulders. There are some flaws in it. Interestingly, this is the version made from RAW files converted to JPEGs whereas the one with no errors was made using JPEGs straight from the camera. I think the real problem is that I may have included one image that I didn't want to.
Thursday, April 26, 2012
Tuesday, April 24, 2012
Monday, April 23, 2012
Wednesday, April 18, 2012
Final meeting session Wednesday, May 2nd 8-10am
We are going to have the final critique on Wednesday, May 2nd 8-10am.
Please note that any photo equipment belonging to the department must be turned in by Thursday, April 26th.
Please note that any photo equipment belonging to the department must be turned in by Thursday, April 26th.
Extra credit oppurtunity....
If you create a 3D model of anything using Autodesk 123D Catch. Please note, you have to use a Windows machine to make it as they don't yet offer it for the Mac.
See the posting below for more information.
See the posting below for more information.
3D Modeling from Photos -Convergence is Now
123D Catch - super sweet program to make a 3D models from a series of photos. This is what I demoed in class. It is made by Autodesk which is a huge name in 3D modeling. The offer a full suite of free 3D apps. They offer a free 3D modeling app for the iPad named 123D Sculpt.
Autodesk student resources
Autodesk resources including some free classes for students
Monday, April 16, 2012
Lytos Light Field Camera
Lytos Light Field Camera - not that usable now, but neither were digital cameras when they first came out. This is a really big deal. It may very well change the path of photography.
Friday, April 13, 2012
Morph X - (nearly) free morphing application for the Mac

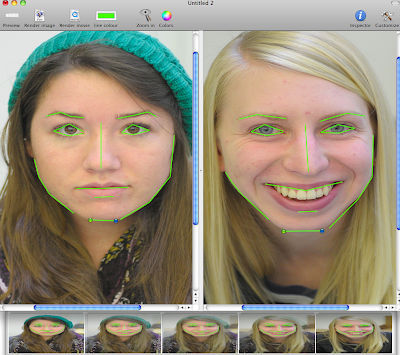
I revisited Morph X, a (nearly) free morphing application for the Mac, since we have a Mac lab and many of you have Macs. It is free for Mac OSX 10.5 and 10.6, but you have to pay $1.99 for it via the App Store if you are 'lucky' enough to be running OSX 10.7 (Lion). At first I didn't really get how the program works, but now that I have played with it more, it is quite capable. Certainly capable enough to complete your morphing assignment.
Like all these programs, there is a bit of a learning curve. So, for your reading pleasure, here is a short tutorial on using it to complete this project.
Once you launch the application, you will see two fields for images. Drag the two photos you want to morph here. Note: You can only morph two images together at a time, so you will have to make multiple first generation composites, then morph the resulting second generation images to create a third generation composite, and so forth until you are left with only one image. This is arguably more work than doing it at once using Sqirlz Morph, but I don't know if it really is.
The part that varies between this application and the others that we used is that you make little lines here whereas in the other apps you only place points. It is pretty much the same thing though.
READ THE MORPH X HELP!! I have copied it below:
MorphX
Use MorphX to transform one image into another. The transformation is saved as a QuickTime Movie or as a Tiff image.
Basic Usage
Drag two images into the First Image and Last Image areas. Alternatively leave one of the images blank, to just use the colour values of one image instead of mixing two.
Draw control lines to identify similar regions in the images. Press the mouse, drag and then release the mouse button to draw a single line to identify an object and then move the line in the other image to the corresponding object. Eg when morphing between two faces you draw lines at the mouth, eyes and around the face in one editor, and then move the lines in the other so that the line on the nose in the first image is on the nose of the image of the second editor.
Connected lines are created by clicking in the image instead of dragging. To finish creating line segments you click twice on the same point. The connected lines work similar to the single lines in how they define the morphing.
Move lines by clicking on them and dragging. Change the angle or length by clicking on the end point of a line and dragging.
Alternatively the arrow keys on the keyboard can be used to move the lines. Pressing Shift or Option while pressing an arrow key moves just one end of the line. Lines are deleted by first selecting them and then pressing backspace.
At the bottom of the window a preview of the morph can be viewed.
There is an inspector for the lines that can be brought forward by selecting Inspector from the Edit menu. The lines movement in the morph can be controlled as well as when and at what speed nearby points should change colour.
When clicking or dragging you can use some mofidified keys to control selection and movement etc.
| Key | Function |
| Control or right mouse button | All lines within a dragged rectangle will be selected. If you click instead of drag the closest line will be selected. |
| Control or right mouse button + Command | Extend or reduce the current selection |
| Alternate | Create a new line even if we're very close to an existing line |
| Shift | Move the closest line. |
Instead of pressing Control you can use the right mouse button.
Calculate the Morph movie by clicking Render Movie in the toolbar at the top of the window. Calculate a Morph still image by clicking Render image. Save the result by clicking the "Save" button in the rendered window.
In a nutshell, you click and it makes a point. You click again it draws a line between the two points. If you double click the last point, it closes the line/path. Then you go to the second window and move the points, and thus the line as well, into position. Notice I just put points/lines on the face and not the hair. That is just an aesthetic choice.
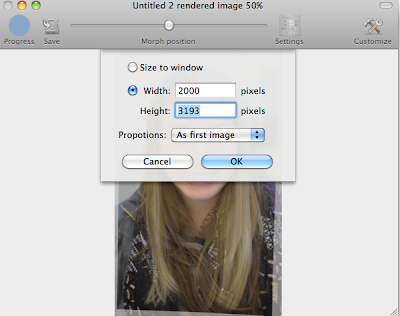
To create a still, you simply click the Render Image button at the top. It is important that you then hit the Settings button. There, you can put in your desired output resolution. I suggest you match it to the first image (the one on the left), i.e. you should up in the pixel dimension of the first image these fields. I put 2000 x 3193 pixels for this example which would indicate that I took the images with a 6MP camera. Hit OK, then hit Save. It will save it as a JPEG. That's fine. Repeat as necessary.
The photo at the top of this posting was made with the settings and points as indicated. It is actually a pretty fast process.
****AS EVIDENCED DURING THE CLASS DEMO, IT WON'T CREATE FILES WITH A PIXEL DIMENSION GREATER THAN 3000 PIXELS IN ANY DIRECTION.**** If you put in the numbers, and the preview looks really crazy, drop the resolution down a few hundred at a time until the preview looks normal then run it.
***BAD LINK NOW*****Trying to locate still...
Here is a PDF that a video professor wrote up on using MorphX to create a simple morph animation. Most of what it says applies. You may find it helpful to read it.
Here is a PDF that a video professor wrote up on using MorphX to create a simple morph animation. Most of what it says applies. You may find it helpful to read it.
***********
Morphy McMorph Morph
Here is some more specifics on using the Morphing applications. Remember to insure that the resolution of the images that you are beginning with are of high resolution. They should be taken at the highest resolution of your camera. The version that you use to stitch may need to be cropped beforehand so, the resolution may be a little less, but not significantly. I expect you each to make a 16x20 print of these images.
FYI-this whole process takes a lot of time; i.e. hours.
Sqirlz Morph- Windows only morphing freeware- Let me begin by saying that this is really a fantastic program. I am really enjoying using it and learning more about it.

First, it doesn't support TIFFs: neither opening them nor saving as. Your options for both at BMP and JPEG. It appears to support non-compressed BMPs so, in terms of absolute greatest quality you should begin with BMPs generated from your RAW files. That being said, it is easier to just open all your RAW files in Camera Raw, select them all, then use the Save dialog in the bottom left to save a high quality JPEG of them all.
Sqirlz (I love saying that!) allows you to open and work with multiple images at once. This is awesome. You are going to have to decide how many images you want to work with at once. You might find it more difficult to work with more images at once. I worked on two at once, then opened another one. It will try to autoplace all the points you already made on the newly opened image. You can and should save the project frequently by going to File > Project > Save As. I think the best bet is to take the approach of beginning with two images and placing all the points. Save. Then open another image and move the points as necessary. Save. Repeat until complete. Then, follow the directions below from the program's help to combine them into one image (You can get to these instructions by going to Examples > How to Make an Averaged Morph Image):
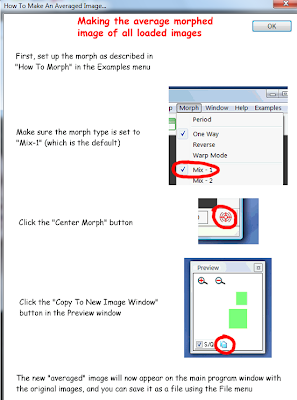
To save the resulting composite image, go to File > Save As. Select BMP as the file format. Check the resolution of the final morphed image to make sure it is still the appropriate resolution.
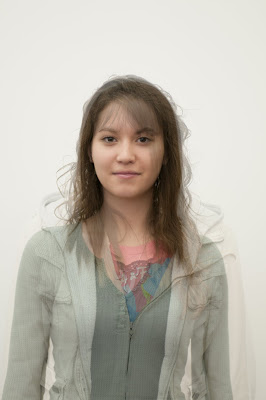
For this sample image, I morphed Sarah, Qina, and Kayla together. I used 31 key points for each image. You may require more. I only keyed points in the face as that is the look that I like. I love the weird semi-opaque overlap of the other areas.
Morpheus Photo Morpher Mac is a $29 morphing app for Macs. You can download a fully functioning 30 day trial. You can definetely use it with high resolution images to create a high resolution morphed composite image, but the set up is a little tricky.
Begin by dragging the photos you want to work with into the image boxes. To get the resolution issue squared away, from the main menu go to Timeline > Options. In the Size fields, input the size in pixels that the resulting morphed image should be. I suggest that you use the pixel dimensions from the larger of the two source images.
To Save the project in Morpheus, you go to File > Save Layout As. Save frequently, saving multiple versions as you go. I suggest you open up one image, put a bunch of key points on it. Then move the key points in the second image to where they should be. It is nice that they are color coded. I can't find a way to morph multiple images into one using this program. You will have to morph in multiple generations. Morph two first generation images together to create a second generation. Repeat the process until all pairs of morphed images are second generation images. Then morph the second generations together, etc. into you have a single image. This is more time consuming than using Sqirlz, but it seems to be the best available for the Mac. Plus, you will get a different result this way. It may be more interesting?
When you want to create the still image, you have to go to File > Render Timeline. Select TIFF as the file format. The program will create 15 TIFFs; one for each 'frame' of the animation. Pull the one you want from the middle. Check the resolution of the final morphed image to make sure it is still the appropriate resolution.
FYI-this whole process takes a lot of time; i.e. hours.
Sqirlz Morph- Windows only morphing freeware- Let me begin by saying that this is really a fantastic program. I am really enjoying using it and learning more about it.

First, it doesn't support TIFFs: neither opening them nor saving as. Your options for both at BMP and JPEG. It appears to support non-compressed BMPs so, in terms of absolute greatest quality you should begin with BMPs generated from your RAW files. That being said, it is easier to just open all your RAW files in Camera Raw, select them all, then use the Save dialog in the bottom left to save a high quality JPEG of them all.
Sqirlz (I love saying that!) allows you to open and work with multiple images at once. This is awesome. You are going to have to decide how many images you want to work with at once. You might find it more difficult to work with more images at once. I worked on two at once, then opened another one. It will try to autoplace all the points you already made on the newly opened image. You can and should save the project frequently by going to File > Project > Save As. I think the best bet is to take the approach of beginning with two images and placing all the points. Save. Then open another image and move the points as necessary. Save. Repeat until complete. Then, follow the directions below from the program's help to combine them into one image (You can get to these instructions by going to Examples > How to Make an Averaged Morph Image):

To save the resulting composite image, go to File > Save As. Select BMP as the file format. Check the resolution of the final morphed image to make sure it is still the appropriate resolution.

For this sample image, I morphed Sarah, Qina, and Kayla together. I used 31 key points for each image. You may require more. I only keyed points in the face as that is the look that I like. I love the weird semi-opaque overlap of the other areas.
Morpheus Photo Morpher Mac is a $29 morphing app for Macs. You can download a fully functioning 30 day trial. You can definetely use it with high resolution images to create a high resolution morphed composite image, but the set up is a little tricky.
Begin by dragging the photos you want to work with into the image boxes. To get the resolution issue squared away, from the main menu go to Timeline > Options. In the Size fields, input the size in pixels that the resulting morphed image should be. I suggest that you use the pixel dimensions from the larger of the two source images.
To Save the project in Morpheus, you go to File > Save Layout As. Save frequently, saving multiple versions as you go. I suggest you open up one image, put a bunch of key points on it. Then move the key points in the second image to where they should be. It is nice that they are color coded. I can't find a way to morph multiple images into one using this program. You will have to morph in multiple generations. Morph two first generation images together to create a second generation. Repeat the process until all pairs of morphed images are second generation images. Then morph the second generations together, etc. into you have a single image. This is more time consuming than using Sqirlz, but it seems to be the best available for the Mac. Plus, you will get a different result this way. It may be more interesting?
When you want to create the still image, you have to go to File > Render Timeline. Select TIFF as the file format. The program will create 15 TIFFs; one for each 'frame' of the animation. Pull the one you want from the middle. Check the resolution of the final morphed image to make sure it is still the appropriate resolution.
Tuesday, April 10, 2012
Morphing
Your assignment is to make a morphed composite portrait.
As noted in class, there is not discussion of morphing complete without Michael Jackson's Black or White video.
Nancy Burson personal website.
ArtNet article about a Nancy Burson show in 2002. It is a nice intro to her work.
Nancy Burson: Making Faces is a nice overview of her work.
Village Voice article on Nancy Burson.
Article which talks about Nancy Burson's Age and Race Machine.
Another article about Nancy Burson's Human Race Machine.
ArtForum article on Nancy Burson as inspiration.
Arken Museum's Nancy Burson holdings.
Gerhard Lang's The Typical Inhabitant of Schloss-Nauses 1992/2000
Composite Photography 1/5
1992/2000 was made using film and non-digital methodology.
Very early composite portraits by Francis Galton.
Interesting blurb about Lang's composite image.
Facing Australia - the website of the photographers who completed the Face of Sydney project.
Article about the content of the Facing Australia project.
The official Face of Sydney website.
A Syndey Morning Herald article about the Face of Syndey project.
Face of Sydney video unveiling. Audio serves to provide the context of the images.
Hot or Not composite images.
Abrasoft Fantamorph is the program that the Face of Tomorrow artist used. It is available for PCs and Macs. This is the most full featured morphing software available; as such it isn't free. Here is a little review of Fantamorph.
Quick morph of Britney and Barbie using Fantamorph.
Sqirlz Morph is a free Windows morph application. I saw some images that were put together using it and they looked good. I really like it. It is very simple to use and very intuitive.
FotoMorph is a free Windows morphing application. I haven't used it, but it has ads in it.
Morpheus Photo Morpher Mac is a morphing app for Macs. I haven't figured out if you can save a still image with it yet.
MorphX is a free morphing application for Macs. Works very well. Please see my later posting for a tutorial on its use.
JavaMorph is a platform independant morphing app. As it runs in JAVA, it should run on all OSs. I haven't tried it yet.
WinMorph is a free Windows morphing application. I haven't tried it yet.
FaceMorpher is a Windows morphing app. There is a free Lite version that allows to photos to be merged.
Morph Age - a seemingly feature rich still and video morphing application for the Mac. I haven't tried it yet.
Online Face of Tomorrow face morphing application. It was a little buggy when I tried it.
Museum of Contemporary Photography's bio on Nancy Burson.
Collection of age progression morphing videos.
Article on using Adobe Affects for morphing video.
A collection of links on face processing.
Photo Opportunities - a series of morphed 'snap shots'
Museum of Contemporary Photography's bio on Nancy Burson.
Collection of age progression morphing videos.
Article on using Adobe Affects for morphing video.
A collection of links on face processing.
Photo Opportunities - a series of morphed 'snap shots'
Sunday, April 8, 2012
Reiteration of the Attendance Policy
As clearly stated in the syllabus and in compliance with the University Missed Class Policy (part of which is copied below), after 3 unexcused absences, your final grade will be reduced a fractional letter grade for each additional absence. A surprisingly large number of students have missed more than 3 classes. If you miss a total of 7 'unexcused' classes, you will automatically receive a failing grade. Please review the missed class policy so that you fully understand what qualifies as an 'excused' absence.
Students are expected to attend every class meeting of courses in which they are registered. Only in specific, unavoidable situations does the University excuse absences from class: 1) personal emergencies, including, but not limited to, illness of the student or of a dependent of the student [as defined by the Board of Trustees’ Policy on Family and Medical Leave], or death in the family; 2) religious observances that prevent the student from attending class; 3) participation in University-sponsored activities, approved by the appropriate University authority, such as intercollegiate athletic competitions, activities approved by academic units, including artistic performances, R.O.T.C. functions, academic field trips, and special events connected with coursework; 4) government-required activities, such as military assignments, jury duty, or court appearances; and 5) any other absence that the professor approves.
Students are expected to attend every class meeting of courses in which they are registered. Only in specific, unavoidable situations does the University excuse absences from class: 1) personal emergencies, including, but not limited to, illness of the student or of a dependent of the student [as defined by the Board of Trustees’ Policy on Family and Medical Leave], or death in the family; 2) religious observances that prevent the student from attending class; 3) participation in University-sponsored activities, approved by the appropriate University authority, such as intercollegiate athletic competitions, activities approved by academic units, including artistic performances, R.O.T.C. functions, academic field trips, and special events connected with coursework; 4) government-required activities, such as military assignments, jury duty, or court appearances; and 5) any other absence that the professor approves.
Thursday, April 5, 2012
Next week's agenda...
Tuesday - quiz over the remainder of the book. Complete your panorama. Print your Little Planets or anything that you want/need printed.
Thursday- critique of current work. I want your images to be so awesome, that they bring me to tears.
HDR image
360 of an interior
Little Planet
outside panorama
Thursday- critique of current work. I want your images to be so awesome, that they bring me to tears.
HDR image
360 of an interior
Little Planet
outside panorama
Friday, March 23, 2012
Photograph a Significant Outfit ***OOPS...posted for the wrong class...Extra Credit if you complete it
There is an artist by the name of Miranda July whose work I adore. She is an author, performance artist, conceptual artist, actor, director, and all around amazing. She has a website, Learning to Love You More, which provided assignments for the public to complete. People would then submit their complete work for possible inclusion on the website. No longer active, it is still a fantastic site. I am asking you to complete Assignment #55: Photograph a Significant Outfit. There are lots of examples there. This is due on Tueday as a RAW file. You will have time to edit it in class then post it Flickr. If you look through this blog, you will see a number of student examples (some better than others).
If you want to read a really excellent collection of short, quirky stories, then I encourage you to read Miranda July's book No One Belongs Here More Than You.
If you want to read a really excellent collection of short, quirky stories, then I encourage you to read Miranda July's book No One Belongs Here More Than You.
Thursday, March 1, 2012
The degree of editing that is really necessary for a great print
Interesting Luminous Landscape article about creating a B&W Master Print. It is almost all about editing. I think you may be amazed at the amount of work put into the editing of a single image.
Wednesday, February 29, 2012
Please bring your daily self portraits to class on Thursday
Please bring your daily self portraits to class on Wednesday. They don't have to be edited at all, I just want to see them all in Bridge to see where you are at with them.
Remember, quiz on Thursday.
Remember, quiz on Thursday.
dpreview article I was looking for about software lens correction
Here is the link to the dpreview article that I was looking for in class last week. Essentially, software lens correction is relied upon by point and shoot cameras rather than producing a better lens.
Computational Photography is the next thing in photography.
Computational Photography is the next thing in photography.
Tuesday, February 28, 2012
Monday, February 27, 2012
41 MP cell phone announced
Gizmodo article addressing this ridiculousness.
Specs on the Nokia phone.
Petapixel.com article about the phone with links to sample images.
Specs on the Nokia phone.
Petapixel.com article about the phone with links to sample images.
Subscribe to:
Comments (Atom)
