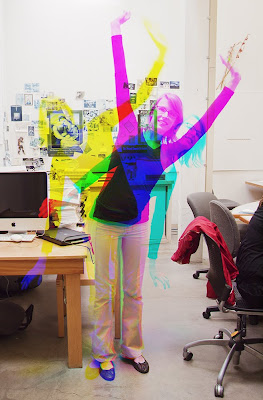
Even though this assignment is based on a technical/creative technique, I still want them to be great images. Please take some time and make a really strong image.
RGB Multiple Exposures. I showed you images in which three separate exposures where taken on the same piece of film using a red, green, and blue filter respectively. You can achieve the same effect by taking one channel from each image (red, green, blue) and combining them into a new image. The trick is that have to use a tripod to take three photos of a scene in which part of it has movement and part of it does not. Then you have to try to anticipate how the resulting image will look as you shoot it.
Here is a nice tutorial on how the get a Harris Shutter Effect. This process is really more like early color photography than a Harris Shutter as it requires three exposures; one through each of the primary additive colors: Red, Green, and Blue. A Harris shutter is used during a single exposure. It's goal isn't to create a normal looking image, rather to create a full color image with some funky color fringing in order to demonstrate how RGB color works.
How to combine the channels into one composite image
In order to combine them into one as shown above, you first edit one of them using Camera Raw. Then synchronize all three images. Then take one of the images, select the Red channel, right click it, select Duplicate Channel, Create New, name it Red. The basically do the same for the other two channels, taking the Green from one image and the Blue from another. These new images will be in a weird Mulichannel Mode. Go to Image > Mode and change the mode to Grayscale for each of them. Save each of the three files to the same directory as TIFFs (I don't think that you have to do this, but it is a good idea should something go wrong). Then, go to one of the grayscale files, let's say Red. Make sure the other files are also open so you should have three files open now, one named Red, one named Green, and one named Blue. Select one of the images. Go to the Channels Palette. Hit the little hidden menu icon in the corner to revel the drop down menu. Select Merge Channels. Then select RGB Mode. Make sure it is set to 3 colors. Then hit OK. It should automatically list the three channels that will make up the color version. Make sure all 3 channels are indicated in the correct order. This will then give you full color image. Are that didn't move should look normal and those parts that moved will have different colors to them.
NOTE: You will get a slightly different look by changing the images from which you took the respective primary color from. That is to say, you can take the Red, Green, and Blue channels from a different one of the original color images. This will result in the colors being different.
Have fun with this assignment!
No comments:
Post a Comment